1. Welcome to 4Runners.com!

    You are currently viewing as a guest! To get full-access, you need to register for a FREE account.

    As a registered member, you’ll be able to:
    • Participate in all 4Runner discussion topics
    • Transfer over your build thread from a different forum to this one
    • Communicate privately with other 4Runner owners from around the world
    • Post your own photos in our Members Gallery
    • Access all special features of the site

HeathTPR's Basic White Trail

Discussion in '5th Gen Builds (2010-2024)' started by heathTPR, Sep 8, 2020.

  1. Sep 8, 2020 at 9:07 AM
    #1
    heathTPR

    heathTPR [OP] New Member

    Joined:
    Jun 16, 2019
    Member:
    #10286
    Messages:
    14
    Gender:
    Male
    First Name:
    Heath
    Vehicle:
    2014 White 4Runner Trail Premium
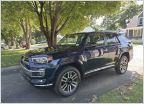
    Just realized I never really showed the 4runner I have or talked about what I've done and what I plan to do.IMG_6110.jpg
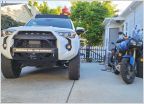
    Here's my white '14 Trail Premium. The very first thing I knew I wanted to do was replace the front logo with the TRD Pro valence. Since I got it used, the tires were in pretty bad shape so when it finally came time to upgrade the tires, I decided to get 33" General Grabber ATXs
    IMG_6123.jpg IMG_6124.jpg
    The 33s fit perfectly with no rub, but I ordered a 3" Lift just because so I'll update when that comes in. I plan on plasti-dipping my wheels in the next few months and hopefully throw a roof-rack on top. I'll keep updates coming as stuff happens!
     
  2. Sep 19, 2022 at 9:15 AM
    #2
    heathTPR

    heathTPR [OP] New Member

    Joined:
    Jun 16, 2019
    Member:
    #10286
    Messages:
    14
    Gender:
    Male
    First Name:
    Heath
    Vehicle:
    2014 White 4Runner Trail Premium
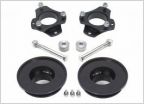
    Long time since an update, sorta forgot I had this thread. Back in October of 2020 I got my 2014 Trail lifted. Went with a Daystar 3" front, 2" back coil spacer kit. Had them professionally put in since I didn't have the time or the knowledge (or the tools) to do it myself. Had the kit in since then and love it, it looks great and didn't take away from the ride quality (besides me being lazy and not getting new shocks in the back.
    IMG_6337.jpg IMG_4456.jpg
    I don't have any pictures of it, but I upgraded all the speakers in the doors and trunk hatch during my Christmas break of 2020. Front driver and passenger side doors I got Kickers, and for the back 2 doors and the 2 in the trunk hatch, I went with Pioneers. Sounds incredible compared to the stock speakers in my opinion, a very noticeable difference and a must-do mod for me.
    Next on the list, the one that I wanted to knock out wayyyyyyy before I actually got around to it was plasti-dipping the wheels. Really just haven't raised the funds to get ideal wheels for my 4runner yet, but I knew the look I wanted so I went for it. Used the card trick with a deck of Impractical Joker's game cards (that I didn't know existed till I saw that they were the cheapest at Walgreen's) and placed bags behind my wheels so nothing would get through to my brakes. Took about 7-8 hours to do it all, mostly because I really wanted to get it right. Did 7 coats on each wheel and let them dry for 45 minutes between each coat, but it was worth it to avoid it looking like a cheap spraypaint job, even if it was.
    68039984804__7A56B63F-0996-4F3F-875A-C696D7488075.jpg
    Personally, I think it turned out very nice, and it's held up very well. Considering getting them powder coated if I decide to stick with the stock trail wheels, but if I'm spending money like that I might as well just get new wheels. Regardless, I'm a big fan of my own car so I take a lot of pictures of it.
    IMG_4418.jpg
    IMG_4436.jpg IMG_4429.jpg
    The very last thing I did to it before I went back to school was deadening the sound in all the doors and the trunk hatch. Got 75 sq. ft. of sound-deadening material off Amazon and took the trunk apart first. Removed the speakers, cleaned and degreased the outside metal of the inner hatch, and put the deadening material along the back of that hatch. I lined the plastic door cover's inside with the material, put the speakers back, and plugged everything back before replacing the door cover. The process for the 4 doors went just about the same. After taking the door apart, though, I rolled the windows down just to make sure that I knew where the window sat inside the door when it was down. I cleaned, degreased, and lined the inner wall with it as well as the inside of the door cover and put the covers back on. A very tedious and time-consuming project, but the results were SO worth it. Speakers knock harder and the road noise got cut in half. Typically had to almost yell to be able to talk to somebody in the backseat during road trips at high speeds. Driving to school, I had no issues talking to anybody in the back, even when on the freeway going 75+. One of the most satisfying mods for me, and I hope I get around to deadening the dash and floors at some point.
    Should be all caught up now, I'll make sure to update in a timely manner next time, as opposed to 2 years after).
     

Products Discussed in

To Top