

-
Welcome to 4Runners.com!
You are currently viewing as a guest! To get full-access, you need to register for a FREE account.
As a registered member, you’ll be able to:- Participate in all 4Runner discussion topics
- Transfer over your build thread from a different forum to this one
- Communicate privately with other 4Runner owners from around the world
- Post your own photos in our Members Gallery
- Access all special features of the site
 Cocoa color Weathertechs
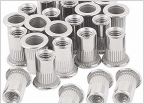 Skid Plate Bolts Stripped, Oversize Tap and Drill Bit?
 Led headlights
 Rocky Mounts 14er Roof Basket
 Rear Camera Relocate Question
 Retrofit Homelink Module In SR5 Roof Console?
Cali Raised LED 43" Dual Function Light Bar Install/Prinsu Roof Rack
Discussion in '5th Gen 4Runners (2010-2024)' started by DmackSCV3, Apr 16, 2023.


