1. Welcome to 4Runners.com!

    You are currently viewing as a guest! To get full-access, you need to register for a FREE account.

    As a registered member, you’ll be able to:
    • Participate in all 4Runner discussion topics
    • Transfer over your build thread from a different forum to this one
    • Communicate privately with other 4Runner owners from around the world
    • Post your own photos in our Members Gallery
    • Access all special features of the site

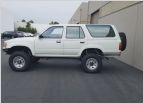
New coils and 1.25" spacers, got rid of that sag!

Discussion in '2nd Gen 4Runners (1990-1995)' started by Dezman92, May 2, 2019.

  1. May 2, 2019 at 7:41 PM
    #1
    Dezman92

    Dezman92 [OP] New Member

    Joined:
    Mar 13, 2019
    Member:
    #9168
    Messages:
    96
    Gender:
    Male
    First Name:
    Doug
    Norcal
    Vehicle:
    1994 Green 4runner
    I wanted to to post a pic and show my runner with new rear coils and spacers. Will spare the write up because diyschool did a very good write up with a video. Thanks fellow 4runnian for sharing that! Here's a link if you want to know how to do it. Basically did the same, but had to use a spring compressor for the left spring
    https://www.4runners.com/threads/mom-butt-rear-suspension-fix-171-diy-instruction-video.9183/
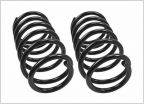
    I used kyb monomax shocks all the way around, MOOG coil springs, and daystar 1.25" coil spacers. I love the way it looks now. I even got paid to do it because it was slow at the shop I work at and they encourage us to work on our cars to make the shop look busy.
    Here's before with the dreaded sag

    IMG_20190414_165101.jpg

    Here's after
    IMG_20190502_184313.jpg
    So yeah if your thinking about taking the sag out, this is definitely the way. Those spacers are the ticket.
     

    Attached Files:

    bthp223, Toy4X4, HoBoDanny and 3 others like this.
  2. May 2, 2019 at 7:47 PM
    #2
    Dezman92

    Dezman92 [OP] New Member

    Joined:
    Mar 13, 2019
    Member:
    #9168
    Messages:
    96
    Gender:
    Male
    First Name:
    Doug
    Norcal
    Vehicle:
    1994 Green 4runner
    Here's another pic of the sag at it's worse

    IMG_20190414_155010.jpg
     
    gunsnob and HoBoDanny like this.
  3. May 15, 2019 at 2:36 PM
    #3
    atgparker

    atgparker Cal Poly, ETME 1988

    Joined:
    Jun 20, 2018
    Member:
    #6296
    Messages:
    337
    Gender:
    Male
    First Name:
    Andrew
    Mission Viejo, CA
    Vehicle:
    1991 White 4Runner 3.0 L
    Rebuilt Engine MLS and ARP on the heads, DT Header, 2-1/2" CARB compliant Flow-Master CAT with 2.0" Bosal CAT back Dayco 1-1/4" Spacers, SkyJacker M-Series Monotube Shocks, Ball Joint Spacers. 95-9006 K&N Air Cleaner, G-Plus Alum Radiator, ZIrgo 16" Fan, Derale Temp switch/relay
    Yup I put Dayco 1-1/2" Polyurethane Spacers (AMAZON for $37) on top of the stock OEM springs last night after I got home from work. Best advice I can add to this job is you remove the M6 screw which secures the T that the flex line uses to secure it to the axle. With that fitting flopping about it will allow you to push the axle down far enough to get the springs in and out without rupturing your OEM rubber brake line! Oh and put the jack stands under the frame where the lower control arms are in front of the rear wheels. Then lower the axle (harbor freight 24" floor jack is under the diff) and take the wheels off on the way down if the stands are not super tall! Remove the shocks at the lower mount. The OEM bottle jack can be used between the top of the diff and the frame to push it down to get the springs out. Clean the spring ends and the rubber lower seats of grit and muck and place the Dayco spacer on the spring and slide it up past the shock side of the axle (the upper OEM spring seat is discarded and not used as the Dayco replaces its function). I used a crow bar and a dead blow hammer to get the spring back over the humps on the axle's spring perch. The first side you install the spring and spacer on is easier than the second one. For the second side I moved the bottle jack to the drum brakes backing plate and frame on that side of the 4Runner and pushed the frame and axle apart to gain enough space (like the video but without the wood). Had to pry and smack the spring with the dead blow to get it over the axles spring perch just like the first spring. Then I pried the backing plate away from the brake drum with my crow bar as the bottle jack will smash it a bit. Observation the pan-hard rod tends to shift the axle to the passenger side (NAS) of the frame as you extend the axles deflection beyond the OEM droop distance. So, I did the passenger side spring first and the drivers side spring second. As long as the crow bar is only needed to act as a bit of a ramp to get the coils end over the perch the dead blow does all the work in getting it over the high spot but does require some technique. I was able to do this without loosening any of the pivot points or sway bar link removal but this was the OEM spring and I believe the Moog replacement coil springs have a shorter free length than the OEM coils. So if your replacing the OEM springs with the Moog springs this may be a bit easier with a shorter free length spring. But either way the spacer is 1-1/2 thick and has to have room made for it as you install this in the space between the two spring perches.
    Result:
    Front fender to ground 36" exactly (31 X 10.5-R15 Cooper Discovery All Terrains) as my reference 11" under the cross member of the frame. Back fender to ground on OEM springs was 34" now it is 35-3/4 DS to 35-1/2 PS with a full tank of fuel. Skyjacker M series mono-tubes are looking much better with about 5 inches showing at ride height with about 4 left for droop. Took it out and attacked some speed bumps at 30 MPH. The added 1-1/2 inches of up travel swallowed them like they were not even in the street, "yowsa" that is the business!... Front ball joint spacers are next but with relaxed preload settings on the torsion bars to bring the front ride height back down close to stock OEM height i.e. 3' plus half an inch perhaps at fender to ground but with increased wheel travel for the trouble! I just hope the CV shafts will not bind up at full droop if I forgo dropping the differential and that I can get the front end alignment back into spec.
     
    Fourtoad likes this.
  4. Oct 1, 2019 at 4:58 PM
    #4
    4runningMan

    4runningMan New Member

    Joined:
    Sep 23, 2018
    Member:
    #7255
    Messages:
    2,768
    New Mexico
    Did you have any trouble seating the rear MOOG springs? I’m looking at a set for a 4th gen and I’m reading reviews on Amazon and guys say they don’t seat like the oem rear springs.
     
  5. Oct 1, 2019 at 7:54 PM
    #5
    Dezman92

    Dezman92 [OP] New Member

    Joined:
    Mar 13, 2019
    Member:
    #9168
    Messages:
    96
    Gender:
    Male
    First Name:
    Doug
    Norcal
    Vehicle:
    1994 Green 4runner
    I had no trouble at all. I had to use a spring compressor though because it was kinda a tight fit with the spacers.
     
    4runningMan[QUOTED] likes this.
  6. Oct 1, 2019 at 8:18 PM
    #6
    atgparker

    atgparker Cal Poly, ETME 1988

    Joined:
    Jun 20, 2018
    Member:
    #6296
    Messages:
    337
    Gender:
    Male
    First Name:
    Andrew
    Mission Viejo, CA
    Vehicle:
    1991 White 4Runner 3.0 L
    Rebuilt Engine MLS and ARP on the heads, DT Header, 2-1/2" CARB compliant Flow-Master CAT with 2.0" Bosal CAT back Dayco 1-1/4" Spacers, SkyJacker M-Series Monotube Shocks, Ball Joint Spacers. 95-9006 K&N Air Cleaner, G-Plus Alum Radiator, ZIrgo 16" Fan, Derale Temp switch/relay
    Hey 4RunningMan-

    I re-used the OEM springs with the Dayco Spacers along with Skyjacker's M95 Monotube decarbon gas shock absorbers. So, I cannot really comment on the fit for the Moog springs. All I do know is that they are a shorter free length than an OEM or OME from down under. That swayed me away from going with the Moog springs. Now here is why!

    As for the KYB MonoMax which seems to be preferred with the Moog's I want to point out one fact. The KYB MonoMax provides 7.32 inches of travel for the rear suspension on our 2nd Gen 4Runners. The SkyJacker M9522 shocks provide 9.22 inches of travel for the rear suspension. That is a 26% increase in suspension travel. The ride height with the OEM spring and spacer is just about perfect with about 4" of droop and another 4 inches of travel to bottom-out were the snubbers will compress on the last inch of travel. Several weeks back I did a trail and was quite glad of the articulation provided on some hill climbs with deep offset scallops that usually hault my open-diff progress!... In cycling the suspension I ended up adding a 1-1/4 inch aluminum spacer plate between the pan hard rod and the bracket for the arm on the proportioning valve for the rear brakes to properly bias the line pressure with the Dayco spacers in place. I also tweaked the bracket on the axle where the brake line "T" is fixed so as to relax the tension in the brake line when the axle drops out from under the frame at full droop. With the ball joint spacers now installed in the front suspension, the OEM torsion bars are backed off some 18 to 20 turns at the tension bolts. This settles the under frame height to the floor at 12 inches. The truck is a darn sight more compliant and comfortable than it was when bone stock. The trade off is a bit more body roll when cornering aggressively but the added wheel travel and the horizontal position of the upper a-arm provides about 1.50 inch more track width and softens the initial movement of the suspension. Front end alignment requires about 6 to 8 lines on the snails for caster and a good number of turns on the tie rods to lengthen them to get the toe set right.

    This 2nd gen 4runner now goes over speed bumps with less body jostling than did my 1996 P38 Range Rover, and it had 9 inch travel Bilsteins 7100, BearMach Blue Monsters coils on the front, OME's on the rear from a D-110 with limit straps to keep the rebound from taking the Bilsteins apart and to stop the coils from unseating at full droop. I can claim this 4Runner now has the best ride of any SUV I have ever owned. With my present set-up the M9522 shock with the Dayco spacer and OEM coils the shock will top-out but the coils stay seated and there are 2 more inches of wheel travel going on over what the MonoMax can provide. Seems to me to be suspension nervana!

    Cheers,
    Andrew
     
  7. Oct 1, 2019 at 8:40 PM
    #7
    SR5 Limited

    SR5 Limited New Member

    Joined:
    Sep 18, 2018
    Member:
    #7180
    Messages:
    13,863
    Vehicle:
    1996 SR5 Limited
    My next project......
     
  8. Nov 25, 2020 at 12:40 PM
    #8
    redrunner92

    redrunner92 New Member

    Joined:
    Nov 25, 2020
    Member:
    #18103
    Messages:
    2
    Gender:
    Male
    Vehicle:
    1992 4Runner SR5 - 4WD - Automatic
    Folks,

    I am new to this site; it is a great source of info. I have a 1992 4Runner 4WD and recently added new moog CC255 rear springs, KYB Monomax shocks and 1.25" Daystar coil spacers. As soon as I drove it, I noticed a loud noise coming from the differential which ended up destroying it after 100 miles driven. My mechanic ended replacing the differential and now recommends that I remove the coil spacers. I wonder if anyone has had any issues with their differentials after installing this combination (moogs + 1.25 coil spacer + monomax). Thanks!
     
  9. Nov 25, 2020 at 5:09 PM
    #9
    4runningMan

    4runningMan New Member

    Joined:
    Sep 23, 2018
    Member:
    #7255
    Messages:
    2,768
    New Mexico
    Suspension components trashing a diff is a new one to me.
     
  10. Nov 25, 2020 at 5:16 PM
    #10
    Dillusion

    Dillusion Resident A**h***

    Joined:
    Dec 10, 2018
    Member:
    #7998
    Messages:
    3,199
    Gender:
    Male
    First Name:
    Kyle
    Island in the Middle of the Ocean
    Vehicle:
    2018 TRD OR
    Spacers prolly didn't kill the diff.

    But your mechanic probably recommended removing the spacers because the shocks were not changed.
     
  11. Nov 25, 2020 at 6:19 PM
    #11
    trlhiker

    trlhiker Lazy Bum

    Joined:
    Nov 8, 2019
    Member:
    #11913
    Messages:
    2,332
    Gender:
    Male
    Vehicle:
    1992 4Runner SR5 V6 4X4
    Dezman, what size tires you running? 4runner looks great.
     
  12. Nov 26, 2020 at 12:10 AM
    #12
    redrunner92

    redrunner92 New Member

    Joined:
    Nov 25, 2020
    Member:
    #18103
    Messages:
    2
    Gender:
    Male
    Vehicle:
    1992 4Runner SR5 - 4WD - Automatic
    Actually, I replaced the shocks with KYB Monomax; I had the stock 28 year-old shocks. BTW - I have 31s on the original 15" rims.

    So, what I am getting is that doing the rear upgrade (moog coils + KYB monomax + 1.25" coil spacers) should NOT impact the differential - correct?

    Thanks!
     
  13. Nov 26, 2020 at 10:08 PM
    #13
    Dezman92

    Dezman92 [OP] New Member

    Joined:
    Mar 13, 2019
    Member:
    #9168
    Messages:
    96
    Gender:
    Male
    First Name:
    Doug
    Norcal
    Vehicle:
    1994 Green 4runner
    In the post at that time I had 31x10.5 tires, now I’m running 33x10.5
     
  14. Nov 28, 2020 at 9:20 AM
    #14
    bthp223

    bthp223 New Member

    Joined:
    Nov 14, 2016
    Member:
    #3009
    Messages:
    361
    Gender:
    Male
    Nevada
    Vehicle:
    1990 4X4
    It sure gives you a nice stance now, I like it a lot :thumbsup:.
     
  15. Nov 28, 2020 at 1:28 PM
    #15
    Dezman92

    Dezman92 [OP] New Member

    Joined:
    Mar 13, 2019
    Member:
    #9168
    Messages:
    96
    Gender:
    Male
    First Name:
    Doug
    Norcal
    Vehicle:
    1994 Green 4runner
    Thanks . I like it too and it was pretty cheap to get that stance.
     
  16. Dec 3, 2020 at 2:00 PM
    #16
    atgparker

    atgparker Cal Poly, ETME 1988

    Joined:
    Jun 20, 2018
    Member:
    #6296
    Messages:
    337
    Gender:
    Male
    First Name:
    Andrew
    Mission Viejo, CA
    Vehicle:
    1991 White 4Runner 3.0 L
    Rebuilt Engine MLS and ARP on the heads, DT Header, 2-1/2" CARB compliant Flow-Master CAT with 2.0" Bosal CAT back Dayco 1-1/4" Spacers, SkyJacker M-Series Monotube Shocks, Ball Joint Spacers. 95-9006 K&N Air Cleaner, G-Plus Alum Radiator, ZIrgo 16" Fan, Derale Temp switch/relay
    Well if you lift a 2nd gen 4Runner that has been bone stock for all its life you will impose increased drive line angles to the pinion shaft in your differential and your transfercase. If the nut that secures the drive shaft flange is not tight the pinion shaft bearings may take a crap and bamo you have a differential problem. So my word of advice would be do the lift, pull the drive shaft, check the nut for being properly tight and torqued to specification and then re-stake it and put the shaft back on. Drive it and be sensitive in looking for any vibration.

    When I pulled the drive shaft flange from the back of my transfer-case (240K miles now) to install my disk brake parking brake modification the flange nut when I put it back on and torqued it the staked dimple was passed by quite a bit to bring the nut to proper torque value. So that is my word for the wise, because bearings with 100's of thousands of miles on them are not going to be the same as when they were new with 50 miles on them from the dealer. The preload changes as things wear in and the fact that these flange nuts are staked says that the tension over time will dissipate and the nut will be effectively loose as the wearing in takes place.
     
    SlvrSlug likes this.

Products Discussed in

To Top