1. Welcome to 4Runners.com!

    You are currently viewing as a guest! To get full-access, you need to register for a FREE account.

    As a registered member, you’ll be able to:
    • Participate in all 4Runner discussion topics
    • Transfer over your build thread from a different forum to this one
    • Communicate privately with other 4Runner owners from around the world
    • Post your own photos in our Members Gallery
    • Access all special features of the site

Rebuilding the 3vze engine in my 91.

Discussion in '2nd Gen 4Runners (1990-1995)' started by 9119_4Runner, Jul 22, 2020.

  1. Jul 22, 2020 at 2:15 PM
    #1
    9119_4Runner

    9119_4Runner [OP] New Member

    Joined:
    Jul 22, 2020
    Member:
    #15667
    Messages:
    1
    Gender:
    Male
    First Name:
    Henri
    Vehicle:
    1991 4Runner
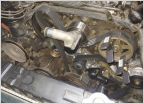
    Left: started with this...
    Right: Progress so far...(just a mock up, nothing bolted yet.)
    PhotoGrid_1571552232552.jpg
     
    Fourtoad and Bob like this.
  2. Aug 31, 2020 at 1:56 PM
    #2
    atgparker

    atgparker Cal Poly, ETME 1988

    Joined:
    Jun 20, 2018
    Member:
    #6296
    Messages:
    335
    Gender:
    Male
    First Name:
    Andrew
    Mission Viejo, CA
    Vehicle:
    1991 White 4Runner 3.0 L
    Rebuilt Engine MLS and ARP on the heads, DT Header, 2-1/2" CARB compliant Flow-Master CAT with 2.0" Bosal CAT back Dayco 1-1/4" Spacers, SkyJacker M-Series Monotube Shocks, Ball Joint Spacers. 95-9006 K&N Air Cleaner, G-Plus Alum Radiator, ZIrgo 16" Fan, Derale Temp switch/relay
    Henri,
    The block is suppose to be black?... The oil pump housing is aluminum not red, ooops. Hey it is a nice solid red though.
    Good luck with your rebuild, but lap the block and heads and use MLS HG's and go for the ARP head studs too! LC Engineering has a kit with all this in it.
     
    Oldtoyotaguy and Fourtoad like this.
  3. Sep 10, 2020 at 9:42 AM
    #3
    TooManyWrenches

    TooManyWrenches New Member

    Joined:
    Sep 9, 2020
    Member:
    #16616
    Messages:
    34
    Gender:
    Male
    Vehicle:
    Beater 94 4Runner
    SO, how tough is the engine removal process. I need to do at minimum the head gaskets on a 94. Last head gasket replacement I did, it would have been better to pull the engine and do the work in my engine stand 9which I eventually did). Any tips you have for pulling the engine?
     
  4. Sep 11, 2020 at 5:25 AM
    #4
    vfrpilot

    vfrpilot New Member

    Joined:
    Mar 14, 2020
    Member:
    #13527
    Messages:
    27
    Gender:
    Male
    First Name:
    Gary
    Vehicle:
    1995 4Runner SR5
    There's never only one way to do a job ........ but the way that I did it was to remove the radiator, then remove the intake, alternator, PS pump and AC compressor in frame. Then pulled the engine and transmission as one unit. It really wasn't that difficult. If you're using a cherry picker, make sure it has enough lift to get everything up and out. The attached transmission makes that part interesting.
    I put it all back in as a unit too. Headers attached and all. Going in was a piece of cake.
    IMG_1073_5ed2d2349f65c42d5cab52667abe42cafba9bc62.jpg
     
    Oldtoyotaguy likes this.
  5. Sep 11, 2020 at 9:27 AM
    #5
    TooManyWrenches

    TooManyWrenches New Member

    Joined:
    Sep 9, 2020
    Member:
    #16616
    Messages:
    34
    Gender:
    Male
    Vehicle:
    Beater 94 4Runner
    yeah the manual says to pull the engine and trans as a unit. my garage doesn't have that much headspace, so I am wondering if the engine can come out without the tranny attached.
     
  6. Sep 15, 2020 at 5:58 AM
    #6
    Fourtoad

    Fourtoad Gatorgrl's Yotas

    Joined:
    Apr 30, 2019
    Member:
    #9712
    Messages:
    628
    Gender:
    Female
    First Name:
    Gatorgrl
    SWFL
    Vehicle:
    1991 V6 5 speed super clean, Black and grey
    Stock with headers and after market wheels.
    Yes it can. We did it on ours when we rebuild the engine. Didn't even have to take the hood off. We took the heads off before we took the engine out, then realized the block needed work so we took it out. Luckily we didn't have to pull our trans out. The headers were a PITA.
     
  7. Sep 15, 2020 at 8:45 AM
    #7
    TooManyWrenches

    TooManyWrenches New Member

    Joined:
    Sep 9, 2020
    Member:
    #16616
    Messages:
    34
    Gender:
    Male
    Vehicle:
    Beater 94 4Runner
    Thats good to know. I started disassembly yesterday. not gonna pull the engine if i don't have to, but its still a maybe possibilty
     
  8. Sep 15, 2020 at 1:40 PM
    #8
    atgparker

    atgparker Cal Poly, ETME 1988

    Joined:
    Jun 20, 2018
    Member:
    #6296
    Messages:
    335
    Gender:
    Male
    First Name:
    Andrew
    Mission Viejo, CA
    Vehicle:
    1991 White 4Runner 3.0 L
    Rebuilt Engine MLS and ARP on the heads, DT Header, 2-1/2" CARB compliant Flow-Master CAT with 2.0" Bosal CAT back Dayco 1-1/4" Spacers, SkyJacker M-Series Monotube Shocks, Ball Joint Spacers. 95-9006 K&N Air Cleaner, G-Plus Alum Radiator, ZIrgo 16" Fan, Derale Temp switch/relay
    Hey TooManyWrenches -
    If your this far into it, take the time and pull the block and get a harbor freight engine stand. Get the block bored and pistoned and ring it and maybe re-grind the crank unless it is in good order? Then after the block is decked for MLS HG's get the MS to remove and leave out the alignment sleeves for the heads and then hand lap the surfaces for MLS-HG's and get the ARP head studs from LC-Engineering.

    The DS OEM exhaust manifold is the most god awful thing Toyota ever came up with and as I just tossed my OEM set into the trash this weekend it totally confirmed the reason why the spark plug insulator on my #6 cylinder had disintegrated at some point in the 232K mile that I had on the ODO when I bought my 91 in 2018. All of the PS bank flows into the DS manifold from the cross over pipe as well as the exhaust from the front two DS cylinders. This absolutely makes it very difficult for the #6 cylinder to expel its exhaust gasses as the entire complement of the rest of the engine's exhaust is at the doorstep of the #6 port in the manifold. The killer here is if you need to get it smog checked then the DT-Header ($700) is the only CARB compliant and/or federally compliant header you can get unless you have access to a station that will look the other way on an LC or other brand of headers that have not got a sticker for smog legal status.

    As for the engine pull I had my lower A-arms on the floor with the ball joints on pieces of wood so I could get the grill down low enough and still pull the engine out and over with a Harbor Freight engine hoist. If you pull the gearbox/t-case the placement of the engine into the engine bay is super easy for getting the motor mounts re-instated with the frame and engine. But if trans is still in then sliding the input shaft into the clutch disk and crank shafts pilot bearing is easy too if you can get a good look at how parallel the bell housing is to the back of the block as they come into proximity with each other. The trick is to have a jack under the gear box's bell housing so you can adjust its angle to the engine.
     
    Last edited: Sep 22, 2020
  9. Sep 15, 2020 at 6:32 PM
    #9
    TooManyWrenches

    TooManyWrenches New Member

    Joined:
    Sep 9, 2020
    Member:
    #16616
    Messages:
    34
    Gender:
    Male
    Vehicle:
    Beater 94 4Runner
    I have decided that if I am going to machine the block, I would probably get a 3.4 swap instead. I just rebuilt a 350 chevy, which is a CHEAP engine to rebuild and it was 1000 in machine shop and rebuild kit parts. A 3.4 is $1500 plus 500 in addons from what I can gather. I'm having a hard time justifying a big outlay of money on a truck that may or may not drive good, for an underpowered engine that has a poor reputation.
    SO far today I only got the intake off (my first Toyota v6), and found a 1/2 quart of oil in the valley of the engine. So maybe cracked head? There doesn't seem to be a leak from the valve covers. NOw I'm stumped on getting the bolts out of the rear accessory brackets on the right head. I also can't figure out how to unclip the wire harness from the air box.
    This is a learning experience for sure, buts its going WAY WAY easier than the 3.2l 6vd1 engine I just pulled and installed (only 3x to get it right) on an old Isuzu Trooper. (that car was pure hell to work on)
     
  10. Sep 22, 2020 at 8:31 PM
    #10
    atgparker

    atgparker Cal Poly, ETME 1988

    Joined:
    Jun 20, 2018
    Member:
    #6296
    Messages:
    335
    Gender:
    Male
    First Name:
    Andrew
    Mission Viejo, CA
    Vehicle:
    1991 White 4Runner 3.0 L
    Rebuilt Engine MLS and ARP on the heads, DT Header, 2-1/2" CARB compliant Flow-Master CAT with 2.0" Bosal CAT back Dayco 1-1/4" Spacers, SkyJacker M-Series Monotube Shocks, Ball Joint Spacers. 95-9006 K&N Air Cleaner, G-Plus Alum Radiator, ZIrgo 16" Fan, Derale Temp switch/relay
    Plug that goes to the AFM has a thin wire that has to be preyed away from the sides of the connector to release its grip on the two molded tabs that are part of the connector half that is on the AFM.

    As for the 3.4:
    • Wire harness modify original or replace it with supplied conversion loom from several vendors that offer this
    • Need ECM for the 3.4 and the engine.
    • Battery and Air box are swapped in position in engine compartment
    • Reuse oil pan from your 3.0
    • May need body lift to clear the engine and bonnet
    • Exhaust is on the other side on 3.4 3rd gens so that needs to be addressed
    This will be more money than a rebuild of the 3.0 but I get your point in wanting to do this.
     
  11. Oct 14, 2020 at 1:12 PM
    #11
    ZARTT

    ZARTT New Member

    Joined:
    Oct 14, 2020
    Member:
    #17324
    Messages:
    35
    Gender:
    Male
    First Name:
    Art
    Vehicle:
    1995 4Runner, Black,Tan Interior, 5spd.,(convert from A340) 207,000 mi., on its 3rd 3VZE.
    Ford Taurus 2 spd. elec. cooling fan, GM CS-144 alternator upgrade. Intimidator AGM battery.
    Hi:
    There is a thin rectangular wire bail, or clip that holds the plug attached to the AFM.
    Unsnapping that clip is the ONLY way to remove the plug.
    There are two small screws that look like they should be removed to unhook the plug. DON'T DO IT!!!!
    You will be able to remove the plug if you take out the screws, but then you will break the delicate wire connections to the delicate internal gizzards of the AFM.
    You will not know that you did this, so when you put the plug on again, the engine will not start, until you fix the carnage that you caused.
    Do not ask me how I came to know this.
    Good Luck.
    Art
     
    Ironguy likes this.
  12. Oct 14, 2020 at 2:43 PM
    #12
    Ironguy

    Ironguy New Member

    Joined:
    Dec 22, 2019
    Member:
    #12421
    Messages:
    7,185
    Gender:
    Male
    First Name:
    Ralph
    Bisbee AZ
    Vehicle:
    2020 Black 4Runner Venture 1967 FJ40 Land Cruiser
    New pine scent hanger, new sun shade
    Hmmmm,how do it know?:notsure:
     

Products Discussed in

To Top